The Missouri Drone Journalism Program has flown more than 450 sorties since December. Our drones have spent more than 38 hours in the air. We’ve had 32 different student pilots fly our drones, and they’ve flown our drones for more than 38 miles. In that time, we’ve had no serious incidents. In fact, our most serious incident was two broken propellers.
We’re proud of our safety record, but we’ve learned some hard lessons along the way. I wanted to share them here, because they’re particularly applicable to pilots who don’t have a lot of time on the sticks — which describes the Section 107-qualified operators at many media outlets.
Lesson 1: Currency is important
The FAA requires private and commercial pilots to fly with a flight examiner occasionally to prove their proficiency. This provision doesn’t exist – yet – for certificated drone operators, so it’s on us to stay current. Skills degrade over time and so does the feel for the drone. Professional drone operators will tell you that an hour a day of practice — indoors or outdoors — is the antidote for that. I’m not sure that journalists who use the drone as part of a reporting toolbox can spare that hour. But you can spare 15 minutes. Go and purchase a cheap Cheerson drone and fly it until its tiny battery runs out, about 12 minutes. And have a practice plan: Today I’m going to do 10 banks to the left, 10 banks to the right, 10 banks with an ascent, 10 banks with a descent, etc. Flying around with no plan is fun, but it doesn’t build the skills the way you want.
Related: Poynter workshops produce new drone journalism ethics policy
Lesson 2: Don’t just fly in P-mode
Most drones have three modes — P, or positioning; A, or attitude; and S, or sport. P is the safest in a lot of ways, in that the drone will use GPS satellites to hold its position in a hover. A-mode holds the drone vertically, but horizontal inputs are open – that is, it will keep moving in the direction it was going at the time the stick was released or if a gust of wind hits it. P-mode, for all its safety, is susceptible to wireless interference that can cause the drone to fly away out of your control. It also can cause jerky movements when you’re trying to stop. A-mode takes away the GPS interference issue and gives much finer control to the pilot.
But it’s about more than that: At some point flying in P-mode, something bad or unexpected is going to happen. The drone’s navigation software will burp, a warning like “Compass error — exiting GPS mode” will come up on your screen and the drone will stop obeying your inputs. It happened to me one night in June doing a post-maintenance flight on a DJI Phantom 4 Pro+. It was in P-mode and the flight plan was to rise straight up to 20 feet, fly straight forward at 8 mph, stop and then rise to 60 feet and hover. Everything worked great until halfway through the rise-to-60-feet portion when “Compass error — exiting GPS mode” came up on the screen and the drone started drifting backwards. I pushed the right stick forward to try and counteract the drift and nothing happened. Then the drone started to drift to the right without my commands. I switched into A-mode and brought it back down safely, but there were 30 white-knuckle seconds in there.
Related: The Drone Journalism School Webinar
Lesson 3: Beware of helicopters in low-cloud ceiling environments
We were flying one of the drones on a mapping mission in the middle of nowhere. We were 60 miles away from the nearest airport or helipad. We were flying at 400 feet with solid clouds beginning at 1,200 feet, well within legal limits. Mapping mission went fine. Drone came down fine.
About two minutes later the air filled with the sound of rotor blades. A medical evacuation helicopter flew within a half-mile of where we were at about 120 feet off the ground – right about where the drone would have been a few minutes earlier. There are no flight minimums for helicopters. And this pilot was trying to find clear visual flight conditions underneath the clouds. He or she had no expectation that a drone was going to be flying. And because they were coming from upwind, we didn’t hear it coming until it was almost right on top of us. If the drone was in the air when the helicopter came by, I don’t think we could have dropped it fast enough. And I don’t think the pilot would have seen a white drone against a gray sky.
Lesson 4: Wind is variable
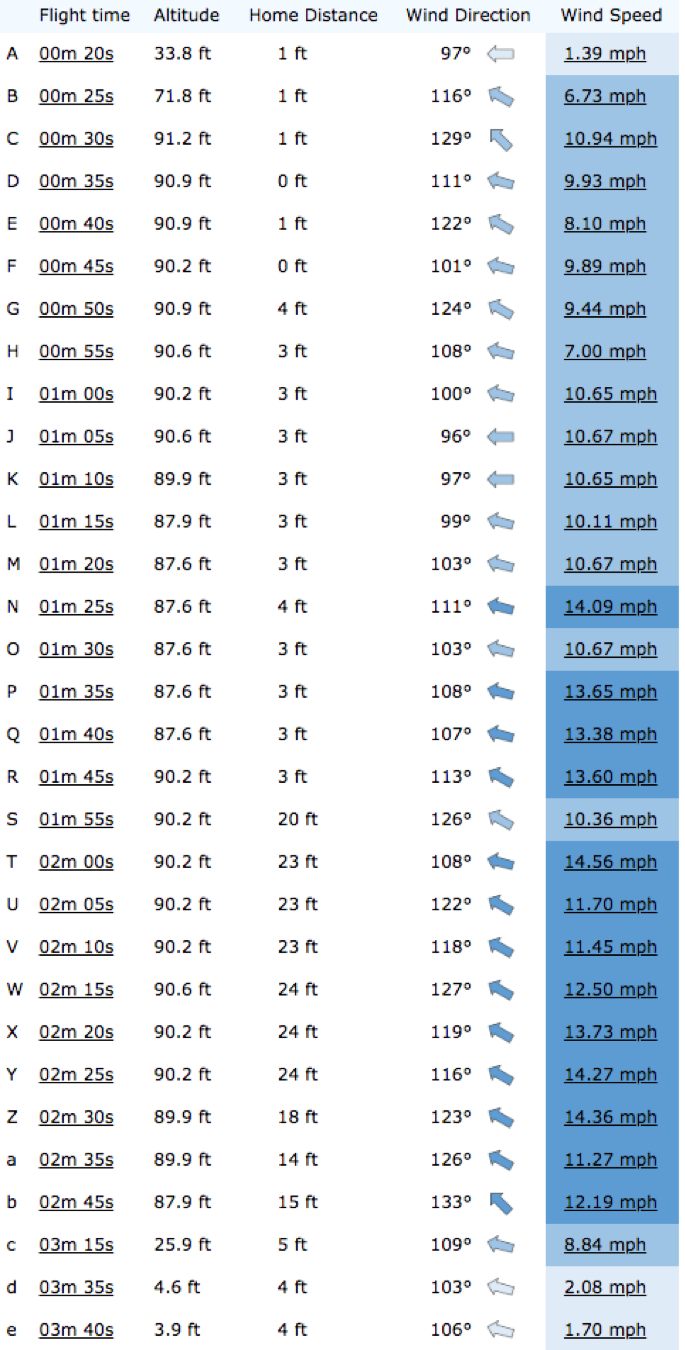
You’re down at the surface and it’s dead calm, or maybe a 5 mph gentle breeze. You get up in the air and the drone is getting buffeted by 10 or 15 mph winds — or more. We’ve had situations with a 25 mph wind difference between the surface and 50 feet in the air. There’s a mental disconnect between pilot and craft, which creates its own dangers. And then there’s the whole physical struggle: How do you keep a drone balanced and oriented while also fighting the wind? The drone’s motors can do a pretty good job of fighting the wind — until you catch a 50 mph gust and the best forward speed you can muster is 25 mph. At that point, you’re going backwards at 25 mph and need to mitigate quickly. The graphic below — made using AirData’s wind-calculation algorithm — shows how quickly wind can change. Note how the drone is really pretty much in the same geographic space (as indicated by distance from the homepoint), even as the wind is changing significantly.

Knowing, or assuming, that the wind will be different above the ground than it is on the ground is an exercise in planning. For instance, let’s say that you’re getting video for a story on a water tower that’s surrounded by trees. It’s a cleared space, but there’s not a lot of room for error. Planning for wind at altitude means planning either a filming orbit above the trees or knowing you have to keep a close watch on the drone and be ready to do an emergency rise to keep you out of the pines.
Lesson 5: Plan everything
This sounds trite and kind of ridiculous, but get in the habit of planning out the entire flight, from liftoff to landing. Your batteries are your lifeblood; you don’t want to spend precious power figuring out what you’re doing. Using Google Maps and a marker can take you far when it comes to storyboarding shots. Mark out personal no-fly zones, build a shotlist. There’s always room for serendipity in aerial shooting, but you should go in with a plan.
Planning also includes checklists and briefing. You should be running a pre-flight checklist, either paper or electronic, at the flight site every time you fly. Check equipment, check weather conditions and airspace, etc. If something goes wrong, you’ll have a record that you checked everything. The briefing is just as important. The pilot and visual observer or observers need to be on the same page — and in possession of the same information. Our pre-flight briefs go over airspace, weather and what situations to look out for. But they include more than that. They include mission objectives and communications.
Want to hone your drone photography skills? Sign up for Poynter’s newest webinar series, The Flying Camera.


